Teacher Resources
Classroom Management and Holidays December 08 2009, 0 Comments
Winter Madness
We all know that during the winter holidays our students are thrown off schedule. Maintaining good classroom management is important, especially when they may have surges of excitement from the sugar cookies a parent brought in, anticipation for a special guest or Christmas play.
Right now is a good time to re-think and re-visit our classroom management. While I taught K-2nd grade, I developed strong classroom management skills. All my previous years of substitute teaching and working as a middle school counselor surely helped with this learning process. I also love learning from experienced teachers, and I used many techniques I saw in other classrooms when I got my own classroom.
The Eyes Have It
The most effective means of communication is face-to-face. It's easy to be busy multi-tasking and forget to look our students in the eyes. If we have a positive attitude, look them in the eyes (scanning the room to several children at a time) and let them know we see them, (and we are not looking through them towards the next task at hand) we are much more likely to get them to hear us. Really, who wants to listen to someone who doesn't even look at you? Many teachers are very good at this already. However, in the midst of winter madness we may forget this effective strategy. Please note that I am not talking about the "teacher stare" I remember so well while I was in grade school from my mean 2nd grade teacher. I am talking about smiling, caring and really paying attention to each of the students as we explain the next task.
Your Voice
Imagine the voice of the witch, Ursula, in The Little Mermaid telling you to get out a pencil and paper. Yuck. Who wants to listen to that raspy, bossy and scary voice. Many kids just tune this out over time.
Now, imagine Ariel telling you in a sing-song voice to get out a pencil and paper. Just the way she would sing it makes you want to listen and respond.
Don't get me wrong, sometimes it takes a stern voice to get someone to listen, but most of the time we need to be surrounded by positive energy. Allowing our voices to change pitch and be almost like a song keeps the kids listening for longer periods of time. Yes, I'm sure if we talked like Ursula once or twice they would listen, too. Yet, over time they would learn to tune the Ursula voice out because it's just too negative.
The Importance of Knowing and Saying Each Child's Name
Have you ever had anyone spell or say your name incorrectly repeatedly? After a while you start to get annoyed at the person. Maybe you feel like they don't really care about you, and they just care about what they want from you. Kind of like an old principal I worked with who kept spelling my name with an "e" after two years of me politely correcting her.
Even as a substitute teacher, I made a special effort to get to know each child by name. This always gives the speaker power. Children want to be known and cared for. Forgetting or never saying a child's name with care and compassion is a recipe for disaster. This child will probably learn not to respect the teacher because she can't even remember her name. If you walk into a class as a substitute teacher and in a short amount of time correctly say many of the children's names they will begin to respect you and listen to you more attentively. Of course, this can work in any classroom.
Also, saying a student's full name with dis-content is not only disrespectful, but may even make the student dis-like you and his name. It's important for us to say our students' names with care and respect.
Daily Schedule
A daily schedule is crucial. It was very important for my students to see the schedule on the white board each day. It was actually nice to have them keep schedule with me. It was nice to have it on the white board, because I could easily erase and re-arrange the schedule in a matter of seconds, if necessary. I tried to keep it consistent, but sometimes we had to make adjustments in the middle of the day. If it was written only in my plan book I could have easily forgotten something because I was busy walking around the room. I enjoyed having my students involved in keeping us all on schedule.
Keep It Interesting
Yes, it's true that if we allow the kids to do what they love they will pay more attention. I learned this while doing writers' workshop. My students only wrote books about what they loved.
Finding a way to turn something I find boring around, like division, is a challenge. However, the best teachers know how to find the excitement in the most mundane and boring tasks. For example, if you are working on division and you know the student loves dolphins, try dolphin division.
Doing seasonal activities can be fun and keep it interesting. For seasonal lesson plan ideas and classroom crafts feel free to bookmark the classroom crafting page.
Job Board
How could a teacher survive without a job board? My students kept the room clean. Without a team effort the room would have been a disaster area. I used a bee hive job board. I drew and laminated a Bumble Bear as the Student of the Week. (If you don't want to draw one, you can copy and laminate one inside the front cover of the book.)
Every day the students did their jobs and every week the jobs rotated. I usually had 1-3 students doing each job, depending upon the complexity of it.
Possible Jobs:
- Sharpen pencils in the basket (No pencil sharpening during instruction. Students placed broken pencils in one basket and picked up a sharp one in the other basket.)
- Pass out papers.
- Collect papers.
- Sweep
- Feed fish
- Clean white board
- Organize books in leveled book library. Skim through boxes and make sure all the books are in the right leveled basket.
- Turn off computers.
- Wipe off desks with paper towels. (I sprayed them. I never let the kids near the spray bottle. I had also used shaving cream on the desks for the kids to clean. This works best for each child to do on his own desk.)
- Binders (Make sure all the Writers' Workshop binders are lined up nicely.)
Share Your Ideas
Feel free to share your classroom management strategies in the comments section below. Learning from each other and sharing our ideas saves time and energy.
Classroom Crafts Projects for Halloween September 10 2009, 3 Comments
Halloween Crafting Great Fun for Kids of all Ages
Teachers, if you’re looking for some creative ideas for crafting projects in your classroom, we’ve got detailed materials lists and directions for several fun projects for you.
Check back during October for more Halloween crafts projects.
Decorative Halloween Tote Bag
Supplies and materials you'll need:
- Pacon Construction Paper in Assorted Colors
- Any kind of sturdy box such as cereal box or soap detergent box
- Gloss Decoupage Medium or White Glue mixed 50/50 with water (referred to as adhesive)
- 1" wide bristle brush
- Ribbon
- Scissors
- Markers
Directions to Make Halloween Tote
- Tear construction paper sheets into irregular sizes and shapes.
- Brush adhesive onto small sections of your container.
- Press pieces of paper into adhesive then use brush to smooth. Don't work your paper too much as this may cause smearing of color.
- Overlap edges of paper with next piece, brushing to smooth. Continue until you have covered the entire container. Let dry completely.
- Decorate as desired using cut pieces of construction paper and gluing them down with adhesive. If you want to use markers for decorating, wait until it is completely dry then use the markers. There is a chance of the markers running if you use them before putting the finish coat on your tote, especially if they are water soluble markers.
- Brush several coats of Decoupage Medium or Glue Mixture onto finished piece to give it a durable finish. Allow to dry between coats.
- To make ribbon handles:
- start at the bottom of the box and glue down end of ribbon.
- Run ribbon up one side gluing to secure.
- Leave enough ribbon unglued at top to form a handle then continue gluing ribbon down other side of box.
- Bring ribbon around bottom of box then repeat on other side to form the other handle.
HINT: If it is too hard to hold your wet container while working on it, work in smaller sections and let them dry before proceeding with the next section.
Spider Pumpkin Decoration
Supplies and materials you’ll need:
- A small craft pumpkin
- Black tempera paint
- Paintbrush
- A pair of wiggly eyes
- A small pompon for the nose
- Eight pipe cleaners
- White school glue
- Craft glue (optional)
Directions to Make the Spider Pumpkin Decoration
- Paint the entire surface of the pumpkin with the black paint. Set the pumpkin aside to dry.
- Glue eyes and nose to the front of the pumpkin. Plain white glue should be sufficient to hold them in place.
- Bend the pipe cleaners into L shapes for the legs. Bend the bottom end of the L into a small foot. Bend the top end of the L so that it lies flat against the pumpkin.
- Glue the legs into place, four on either side of the pumpkin. You may want to use craft glue instead of school glue to make them a little sturdier.
- Let the project dry completely before handling.
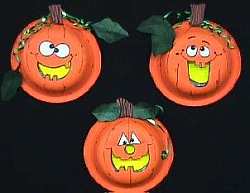
Pumpkin Funny Faces
Supplies and materials you’ll need:
- Small paper bowls (7 1/2 in., 20oz. wt.)
- Orange acrylic paint
- Paintbrush
- Black felt-tip marker
- Pencil
- Scissors
- Construction paper - white, green, brown & bright yellow
- Green curling ribbon
- Glue
- Tape
Directions to Make the Pumpkin Funny Faces
- Turn the paper bowl over and paint the entire backside orange and let it dry.
- After it has completely dried, draw a pumpkin face on the bottom with pencil. Cut out the mouth and nose that you have drawn. You may cut out eyes also, but in the samples shown the eyes were drawn on white paper first and then glued on. This way you are able to make them more expressive.
- Outline the features with a black felt-tip marker. Add a few vertical lines to make the bowl look like a real pumpkin.
- On the inside of the bowl tape or glue a piece of bright yellow paper. This will make it look like the pumpkin has a light on inside.
- Make a brown stem and green leaves from the construction paper. You may make vines with the green curling ribbon. Ask an adult to help curl the ribbon with scissors. Attach the stem, vine and leaves with tape or glue.
Tip: use paper plates instead of bowls for a different look. The Funny Faces are perfect to decorate a wall, door or a bulletin board. Encourage kids to make their pumpkin faces funny, scary or however they want them to look!
Mummy Mobile
Supplies and materials you’ll need:
- Thin ribbon (black works best)
- Heavy construction paper or card stock
- Scissors
- Glue
- White crepe paper
- Markers
Directions to Make the Mummy Mobile
- First, you will need to cut out the shapes for the mummy’s body from the construction paper or card stock. You will need:
- A head
- A torso
- Two arms
- Two legs
- Cut five pieces of ribbon approximately three inches in length and one piece approximately six inches in length. Glue the longest piece to the top of the head for hanging. Glue the head to the torso using one of the smaller pieces. Glue each of the arms and legs to the torso, also using the smaller pieces.
- Draw a face on the head using the markers. Your students may want to draw faces on both sides of the head or they may want to have a front and back of the head.
- Cut long strips of crepe paper and glue them horizontally onto the mummy. If you cut the strips long, the unattached ends will flutter when you hang up the mobile.
- Of course, allow the craft to dry fully before hanging it up.
Easter Crafts for Young Children March 10 2009, 0 Comments
This Easter, why not introduce some new Easter-themed crafts into your classroom? Easter and springtime themed crafts are a real pick-me-up for the winter blahs, and they can really energize your room. Consider the following ideas for implementation in your own classroom:
Pop Bottle Baskets
To make this Easter craft, you’ll need the following materials:
- A two-liter pop bottle
- Scissors
- A hole punch
- Pipe cleaners
- Glue
- Tissue paper
- Craft paint (puffy paint works well)
- Stickers
- Cut off the top two-thirds of the pop bottle and throw out the top part.
- Punch two holes near the top edge, one on either side, to string the handle.
- Attach a pipe cleaner, or braid or twist multiple cleaners to make a handle.
- Glue tissue paper pieces to the bottle to make a multicolored design.
- Have your students further embellish the baskets with paint or stickers after they dry.
Handprint Easter Lilies
To make this Easter craft, you’ll need the following materials:
- Construction paper
- Pencil
- Scissors
- Pipe cleaners
- Glue
- Stapler
- Have your students trace their hands on the construction paper and cut them out (with or without assistance as appropriate).
- Take the construction paper handprint and curl the fingers around a pencil. Make sure to curl all of them in the same direction.
- Then roll the handprint into a cone with the fingertips curling out at the top.
- Glue the cone together and staple it to the pipe cleaner.
- Cut out some leaf shapes and staple them to the bottom of the pipe cleaner.
- Have your students make multiple lilies and tie them together with ribbon to make a bouquet.
Little Easter Lamb
To make this Easter craft, you’ll need the following materials:
- A popsicle stick
- Two clothespins with springs
- Black acrylic paint
- Glue
- Cotton balls
- A pair of wiggly eyes
- Paint the popsicle stick and the clothespins black and let them dry.
- Once dry, attach one clothespin to each end of the stick to form the lamb’s legs.
- Glue one large cotton ball to one end to form the head.
- Then glue cotton balls to the popsicle stick in between the clothespins to form the body.
- Glue a pair of wiggly eyes to the head. Depending on how tight the clothespins are, you may or may not want to glue them in place. Simply glue them in place on the paper.
Egg Magnets
To make this Easter craft, you’ll need the following materials:
- Styrofoam eggs or Styrofoam ovals
- Magnets
- Glue
- Construction paper
- String, yarn or ribbon
- Glitter
- If you have egg-shaped Styrofoam, you will need to cut it in half to give it a flat side to attach the magnet to. You can also avoid this problem by looking for flat oval shapes instead of eggs, or purchase one big flat piece and cut out the ovals in advance.
- Have the children glue the magnets to the back of their eggs and then decorate them. Some suggestions for decoration are to cut out Easter-themed shapes from construction paper and glue them to the eggs, make designs with string, yarn, or ribbon, or cover them with glitter.
Easter Crafts for Preschoolers and Kindergartners March 10 2009, 0 Comments
The Easter holiday offers a terrific opportunity to introduce some Easter and springtime themed crafts into your classroom. Consider the following suggestions to brighten up your preschool and kindergarten rooms and introduce some Easter cheer.
Rabbit Ears
To make this very simple Easter craft, you’ll need:
- Free Bunny Ears template
- Colored Construction Paper
- Two Straws (straight, not bendy straws)
- Glue
- Scissors
- Heavy Duty Craft Glue or Tape
- Depending on the age of the children, cut out a pair of rabbit ears and a pair of inner ears for each child or allow the children to cut out the pre-drawn shapes with assistance.
- Also cut out a long strip for a headband going horizontally across the forehead and around the back of the head.
- Help the children to glue the ends of their headband together, making sure that it fits snugly around the head and won’t fall off.
- Then glue the inner ears onto the outer ears. Attaching straws to the back of the ears helps to keep them upright, but white glue isn’t quite strong enough.
- You can use a heavy duty craft glue, tape or cut two small slits at the top and bottom of each ear and thread the straws through.
- Then glue or tape the ears to the headband.
Fingerprint Easter Egg Basket
To make this Easter craft, you’ll need:
- Free coloring page of an Easter basket
- Finger paint
- Crayons (optional)
- Print one copy of the free Easter basket coloring page for each student.
- Once the pages are colored, have the children dip their thumbs into the finger paint and use them to make “eggs” in the baskets.
- You can also turn this into a counting craft by instructing each child to make a certain number of eggs.
Candy Carrots
To make this Easter craft, you’ll need:
- Clear plastic icing bags
- Orange jelly beans or any other small orange candy
- Scissors
- Green tissue paper
- Twist ties
- Have the children fill an icing bag with candy, leaving space at the top to close the bag easily.
- Take two pre-cut squares of green tissue paper and assist them in grabbing the squares at the center and twisting them slightly to create leaf-like cones.
- Put the cones into the icing bag.
- Close the bag and wrap it with a twist tie.
Butterfly Pretzels
To make this Spring-themed craft, you’ll need the following materials:
- Cardstock or other heavy weight paper
- Crayons
- Glue
- Knotted and straight pretzels
- Have the children color a springtime outdoor picture.
- If you’re working with younger children, you may want to locate a coloring picture and glue it onto the cardstock to give them something to work with.
- For each butterfly, the children will need one straight pretzel to form the body and two knotted pretzels to form the wings.
Barefoot Chicks
To make this Easter craft, you’ll need the following materials:
- Construction paper
- Yellow tempera paint
- Markers or crayons
- Have the children remove their shoes and socks and help them cover the bottom of one foot with yellow paint. You can use a tub and have them step into it or apply the paint manually with a sponge.
- Assist the children in hopping over to the paper or put the paper down for them to stand on.
- Clean up the resulting mess and wait for the footprint to dry.
- Once dry, add a beak and feet to the chick.
- You can draw them on with markers or allow the children to glue on pre-cut shapes.