 Your students will love to create their own one of a kind calendars. The calendars can be created as gifts for parents or grandparents.
Materials:
Students' Instructions:
- Color the months and write the year for each one. Remember to go up one year when you get to January.
- Cut out and glue the month and year to each page of your calendar.
- Write the appropriate number of days on each month.
- Write in any special birthdays or holidays your family celebrates (optional).
- Decorate the sheet of construction paper for the cover.
- Use a hole punch to make three holes along the top.

- Tie string or yarn through the holes.
- Create art for each month. Either draw it straight on the page or create the art for each month on a separate sheet of paper. To make sure it fits on the page, cut around it with scissors (e.g. wavy scissors for a decorative effect) and tape or glue it on.

Your students will love creating their own reindeer puppets and stories. Here's a free lesson plan, printable p uppets, story web and mini-book.
Materials:
Instructions (for students):
- Color the My Reindeer puppet.
- Write notes for the story on the story web.
 Write a draft of the story.
- Cut out the mini-book and staple the pages together.
- Complete the cover, title page and number each page of the book. (There are 7 lines on the web, because one page is a title page.)
- Write the story in the book. (The back of each page, left side, is for illustrations and the right side is for text.)
- Cut out and glue the puppet onto a popsicle stick.
- Act out your My Reindeer story.
 Here's a free Winter Words printable!
Materials:
Instructions:
- Read the instructions (color & trace).
- Read aloud each word with students.
- Students repeat each word.
- Students color and trace each word.
More Writing Help:
This printable has been designed to use after assessing your students' prior knowledge. It is meant to be differentiated, depending upon the student's needs.
Materials:
Instructions:
1. After completing pre-assessments, the student circles the money he/she needs to study.
2. Student draws the amount of money on the right side. Then, the student writes the amount inside the green box.
(E.g., Drawing a simple circle with "25" inside the circle, can symbolize a quarter. Drawing a rectangle with a dollar sign and "1' can symbolize a dollar.)
3. Student draws the gift on the left side. Then, the student writes the purchase price of the gift on the tag.
3. Students draw a line from total amount of counted money to the gift they can buy with that amount. (Needs to be the exact amount.)
Notes:
- On the upper-right of the printable, you will see "other bills to study". This can be used for larger bills (e.g. $5, $10, $100, etc.)
- Here's a Gift Shopping, Learning to Count Quarters and Dollars printable.
- Students can use pretend money as they count. (optional).
More to Help Students Learn about Money:
Materials:
 Instructions:
- Teacher reviews colors and shapes with the students.
- Students color the Christmas trees.
- Teacher posts the Christmas Trees on a classroom bulletin board (optional).
- Create a big Christmas tree in your classroom made from green poster board. Students cut out shapes or ornaments from colorful construction paper and attach the ornaments to the tree. Here's a free ornaments template.
More to Help Teach Your Students about Shapes and Colors:
Here's a Winter Newsletter template for teachers who choose to write newsletters for each season (Winter, Spring, Summer and Fall).
For free access to lesson plans and printables bookmark Crafting with Carol.
December Lesson Plans and Printables:
Bulletin Board
Puppets
Writing
Crafts and Gifts for Parents
Games
What Would You Like for December?
Let us know what you are looking for in the comments section below.
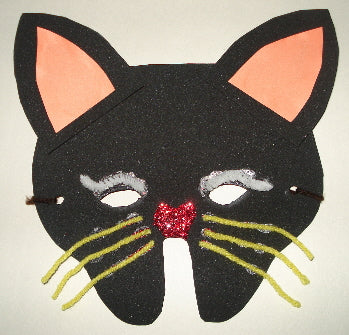
Your students will enjoy creating their own masks and writing skits. You'll find a free, printable mask below. The activity can be differentiated, depending upon the needs of the child. For example, students can re-write a common nursery rhyme or create a story of their own to act out.
[caption id="attachment_6577" align="alignright" width="150" caption="Cat Mask"] [/caption]
Materials:
-
-
Any type of decorative materials for the mask such as string, yarn, chenille stems, colorful construction paper, glitter glue (don't use glitter because it can get in the eyes), feathers, buttons and pom poms.
- String or yarn (to tie the mask on)
- Glue
- Skit Book - To make the book you will need construction paper, several sheets of white paper, hole puncher and string or a stapler. To create the book fold the construction paper in half for the book cover and back. Fold several sheets of white copy paper and slip the pages inside the folded construction paper. Staple the book together or use a hold puncher to make three holes and string yarn through each hole. Students write the title and name on the front of the book.
- A list of nursery rhymes or students create their own story. If your students are creating their own stories, here's a printable story writing web and parts of a story for the students to use.
Instructions:
1. Students create the skit books (see above).
2. Before writing the skits, students can decide to use a common nursery rhyme or create stories using the story writing web. Review the parts of a story.
Here's an example nursery rhyme
Hey, Diddle, Diddle
Hey diddle diddle, the cat and the fiddle,
The cow jumped over the moon.
The little dog laughed to see such fun
And the dish ran away with the spoon!
3. Students share work with each other and proofread the skit books.
4. Choose a character from the story and create the mask.
5. Perform the story or nursery rhyme.
3.
This printable book is ideal for a back-to-school lesson about telling time.
Students create their own stories and learn to tell time.
Materials:
Instructions:
- Create a book as an example before the lesson. (It can be helpful to make the hour red and the minutes blue on both the digital and analog clock.) Bumble Bear is a character in a book I wrote while I was teaching 2nd grade Writer's Workshop.
- Review telling time (analog and digital) using a large clock in your classroom. If you don't already have an instructional clock, here's a free, printable clock. If you are looking for a new morning meeting set, here's an instructional clock to purchase as part of your Morning Meeting Bulletin Board Set.
- Read your Telling Time Book to the students.
- Discuss and write adjectives and verbs on the board. Explain that the book they create will include adjectives and verbs. (e.g. pages 3, 9 and 11).
- Students decide on a character.
- Students write and illustrate their books. (Use pencils, so corrections can be made.)
- Students help each other proofread.
- Students share their books.
- Display books on your classroom bulletin board (optional).
Here's a free sun salutation handout and exercise plan (see below) for you and your students.
 This exercise plan works for teachers and students because it's part of the daily morning routine.
You can choose to follow this daily exercise routine before or after morning circle time.
You Go Home at 3, So You Can Exercise
Teachers have all the time in the world to exercise because they go home at around 3:00 p.m. everyday, right? Oh, the naive statements of those who have never taught. No, world! Surprise! Teachers don't go off and indulge themselves in the hot tub at the gym after the kids are gone at around 3 p.m everyday. Teachers have to correct papers, write the name of every single student on miscellaneous items, clean up messes, write lesson plans for the entire next day (which takes hours after the students are gone), make a bazillion copies and tons of other stuff you don't have time to listen to me list, so I'll get to the point... because I know you have been holding your bladder since 7:30 a.m. and you need something helpful that's quick, free and convenient. Seriously, I want to help you feel better because I know how it feels. Teaching doesn't leave much time for exercising, unless we follow an exercise plan that is part of our teaching day. Like this...
Exercise Plan:
- Sun Salutation - Make an overhead transparency or refer to it as you model the exercise. Assigning a student leader as part of classroom jobs can be helpful, too. As time progresses, students will memorize the sun salutation.
- Jumping Jacks - Set of 25
- Running/Walking - Run or walk around the field as far away from the other classrooms as possible. The teacher and students may want to start out walking. Those who would like to can run. Students will learn to be silent in the hall on the way to the field. Other teachers who may complain about the distraction through the windows can learn to shut their windows or join you. You may inspire other teachers to join you, especially when they start seeing your results.
- Cool Down - Students who finish quickly can begin their cool down. While on the ground, they can stretch their legs and arms.
 Modeling Healthy Choices
When our students see us fitting exercise into the day the impression speaks much more than just talking about it. So, not only are we being a positive role model, we are caring for ourselves so we can live a longer and healthier lives. There is a way to get exercise ourselves while fulfilling the physical fitness needs of our students. I've found that it's easier to fit in the exercise with our students in the morning, rather than trying to fit it in after they are gone.
I've done it both ways. I've let the P.E. teacher do all the physical fitness for the students, but honestly my best summer was when I followed this exercise plan with my students. I felt great and it really helped my students and I focus. I did this during summer school, but I regret not following it during the school year. I think it would have kept me healthier and happier... Like I was that summer. I'm hoping this exercise plan can offer you support and encouragement.
Share Your Stories
Please feel free to share your experiences. What types of physical fitness activities do you and your students enjoy?
Your students will love creating their own egg carton gardens. This easy and fun project is a great way to introduce the plant life cycle. After the seedlings sprout, send the sprouting gardens home or plant your own classroom garden outside!
[caption id="attachment_5297" align="alignright" width="300" caption="Egg Carton Herb Garden"] [/caption]
Types of Gardens
1. Herb Garden - basil, chives, mint, parsley, rosemary and sage.
Explain how herbs are used to season food. If possible, allow the students to smell a small sprig of each herb. Rosemary is especially fragrant. At the same time explain that students should not eat plants without checking with their parent or teacher first. If you have mint, give each student a piece of mint to taste.
2. Fruit & Vegetable Garden- carrots, celery, lettuce, tomatoes and strawberries.
Planting each one of these makes a great salad! If you plant the garden at school, students can eat the salad for a healthy snack. Watching the strawberry grow is very helpful, because the center, yellow part of the flower becomes the strawberry. Watching this flower to fruit transformation is very educational and fun for the students. The carrots grow under ground (as the roots), which is also amazing to the students as you pull it out of the ground! Don't forget to explain that tomatoes are really a fruit, not a vegetable.
Materials:
- 6 pack egg carton (12 pack cut in half)
- soil
- seeds (herbs or vegetables)
- water in a spray bottle
- plastic grocery bag
- pencil or toothpick
- small spoon
- Popsicle sticks (6 per child)
- plastic bugs or butterflies (optional)
Instructions:
- Follow the instructions on the seed packets. Do any seeds need soaking? If so, prepare the seeds ahead of time.
- Use a pencil or toothpicks to poke 5 or 6 holes at the bottom of each cell of the clean egg carton. It may be easier to hold the egg carton on the carpet and push the holes through that way.
- Detach the lid of the carton and cover it with the plastic grocery bag. Now put in underneath the egg cells. This will keep water contained.
- Using the marker, write the name of each seed on the Popsicle sticks.
- Using a small spoon, scoop the soil into the cells, filling about half way.
- Sprinkle the seeds into each cell.
- Sprinkle a small amount of soil over the seeds. Refer to the seed packet for the exact amount.
- Push the Popsicle stick in the soil next to the seeds.
- Glue bugs (butterflies) in between the cells or on the side of the egg carton. Be sure to keep the glue out of the soil. (optional)
- Use the spray bottle to water the plants.
- Place the egg carton garden near a window in the sunlight.
- Teacher assigns a student to water the plants each day, or have each student water his/her own.
- After the gardens begin to sprout send them home to plant outside or plant the sprouts in the school's garden.


